Transform Your Fall Table with Leather: DIY Vase and Napkin Rings
Want to add a personal touch to your fall decor? Learn how to make a leather-wrapped vase and handmade leather napkin rings for your fall table.
Join me as I walk you through the step-by-step process of creating these fun suede leather accents for your fall tablescape!

(This post contains affiliate links, so I may earn a small commission when you make a purchase through links on my site at no additional cost to you. As an Amazon Associate I earn from qualifying purchases.)
Today is all about leather — suede leather, that is!
Fall is the perfect time to add a little rustic elegance to your table. The season calls for a more casual look, and it’s a great time of year to combine more rustic textures with natural elements from your yard to create a cozy fall look.
And as the weather starts to cool, it’s a great time to throw a few leather accents in the mix for a fun twist. The natural texture and warm tones of leather look gorgeous with fall colors, and it adds such a rich look to a fall table!
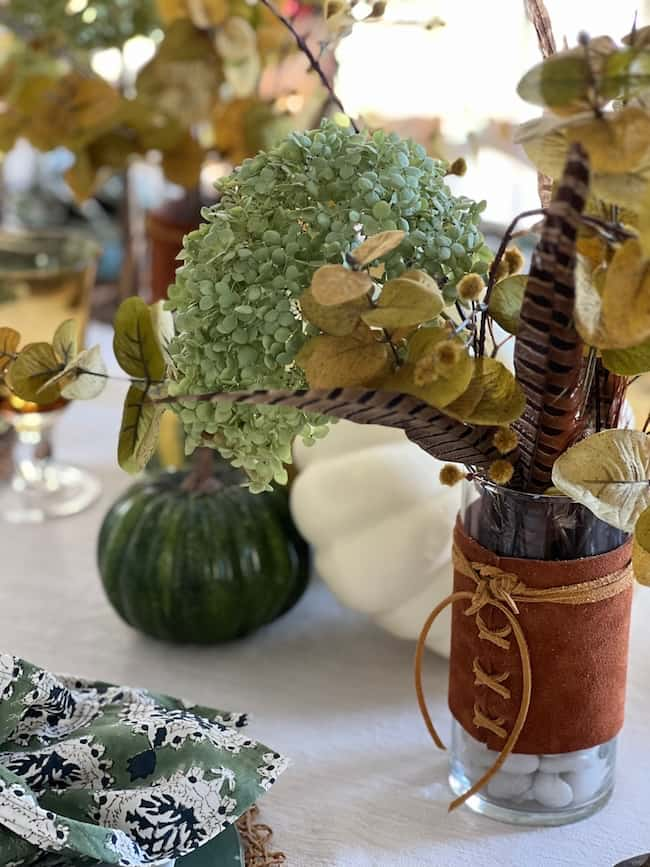
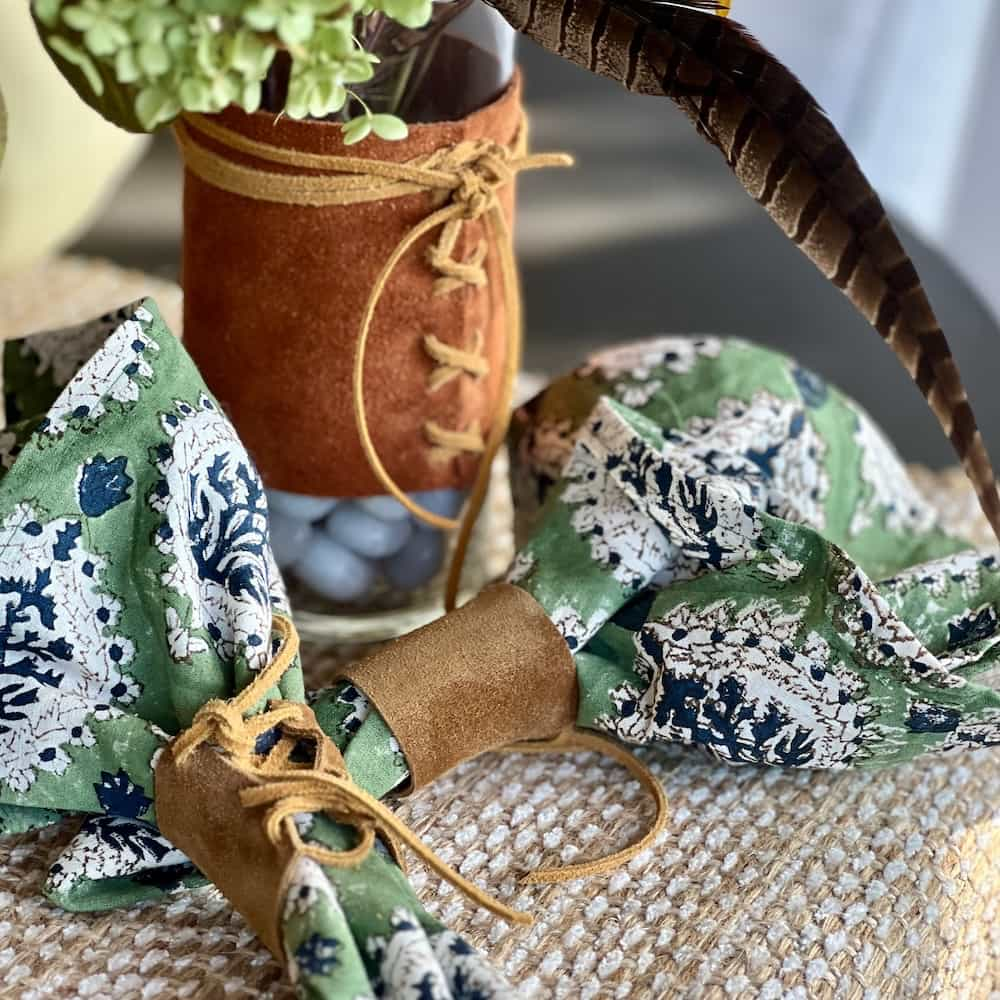
Since I didn’t have any leather decor accessories to add to my table, I decided to craft my own leather accents. My efforts resulted in the cutest leather-wrapped vase full of rustic fall stems and natural elements. And of course, that called for new leather napkin rings to match!
So, today I’m sharing all the details for creating these fun handmade leather table decorations with a step-by-step tutorial!
And, speaking of leather — today you get an extra special treat! I’m joining my creative blogging friends in the Handcrafted Society for our monthly blog hop, and today it’s all about leather and lace!
What’s the Handcrafted Society? The Handcrafted Society is a special group of my very talented blogging and crafting friends who come together each month to share one another’s beautifully crafted creations centered around a specific theme or craft medium for the month — so be sure to check out all of the leather-and-lace-themed crafts at the end of this post!
How I Made a Leather Vase and Napkin Rings for Our Table:
I love adding personal touches to our home with fun DIY projects. These leather-wrapped vases and laced napkin rings add a great custom touch to our dining table.
Materials Needed:
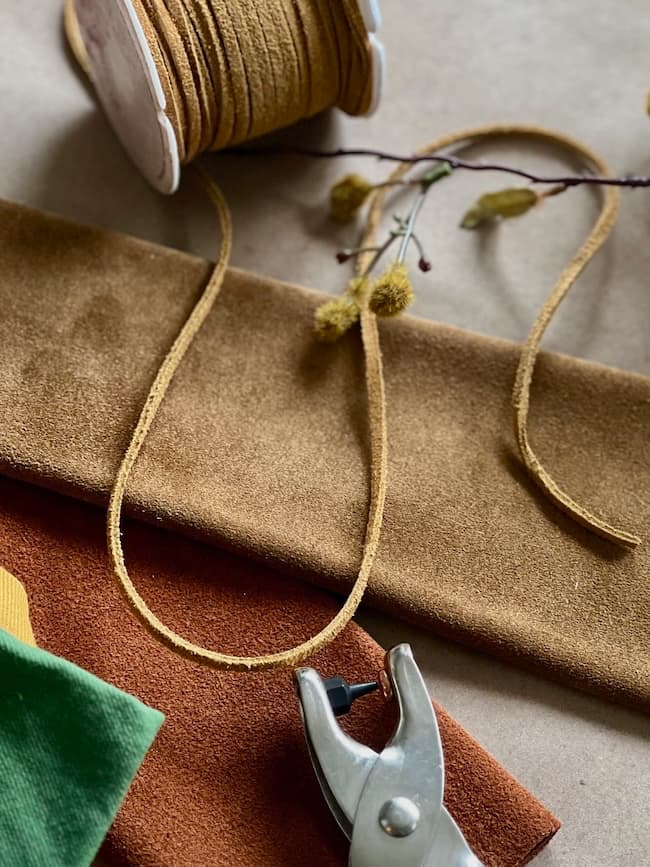
- Suede leather sheets
- Suede leather string
- Leather punch
- Scissors
- Pointed object (such as a sharpened pencil)
- Rotary cutter
- Cutting mat
- Ruler/straight end
- Marker
- Glass cylinder vases (I used inexpensive vases from the Dollar Tree)
- Decorative rock or pebbles
- Fall stems to create the arrangements
Making the Leather-Wrapped Vase: Step-by-Step Instructions
This leather vase is easy to make, but it does take a little time and patience.
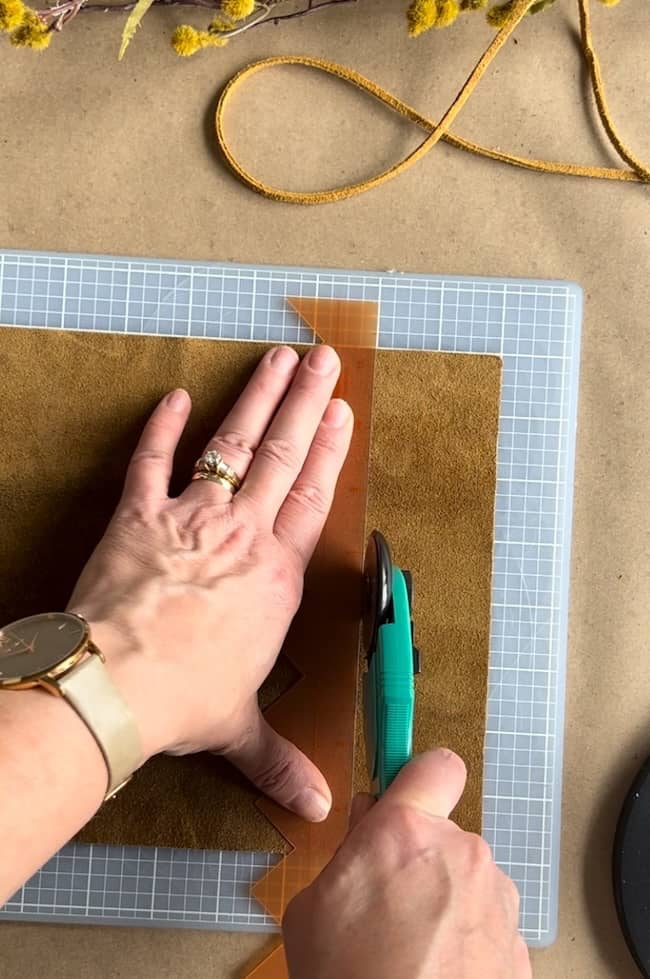
Step 1 — Measure and cut the leather pieces.
The size of leather piece you need will be determined by the size of your glass vase. The leather piece I purchased from Hobby Lobby was the perfect size to wrap the two Dollar Tree vases I used.
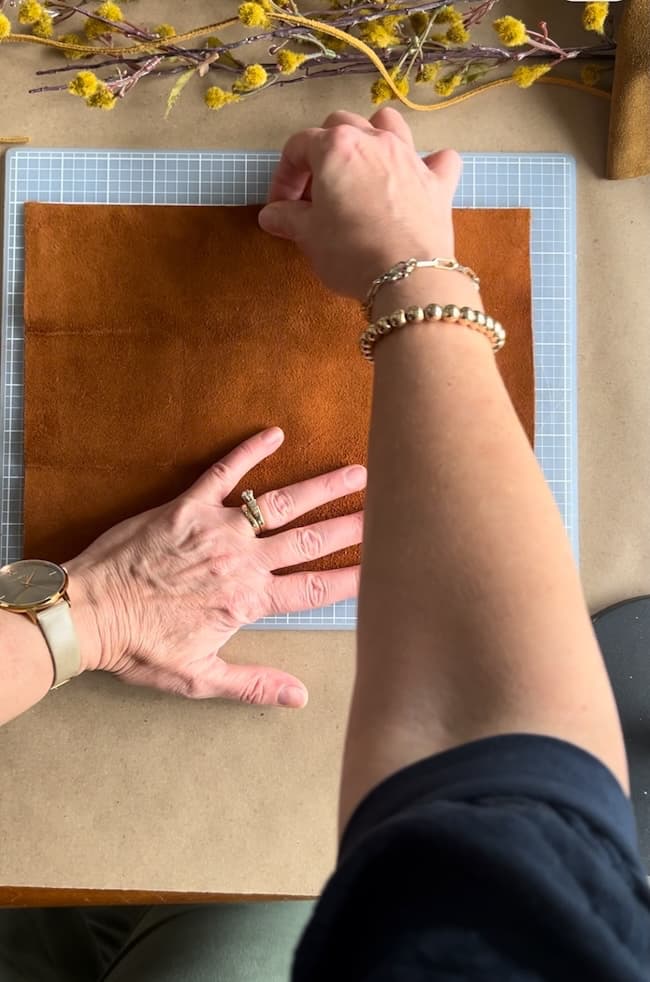
Before cutting, I stretched and squared-up the piece of leather using my cutting board. I used a rotary cutter and straight edge to trim off any edges to make sure I had perfectly squared pieces.
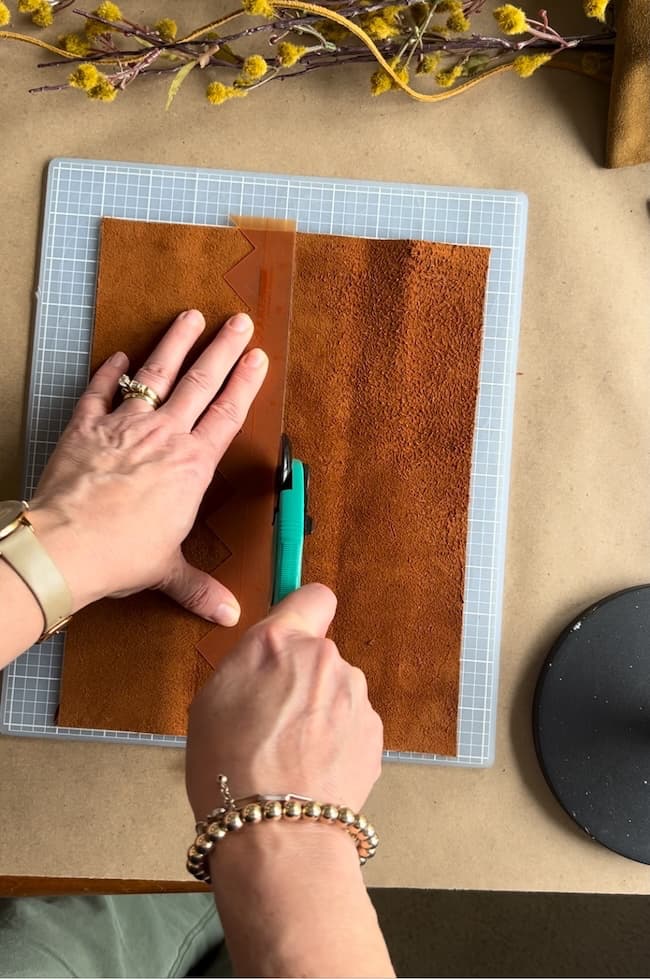
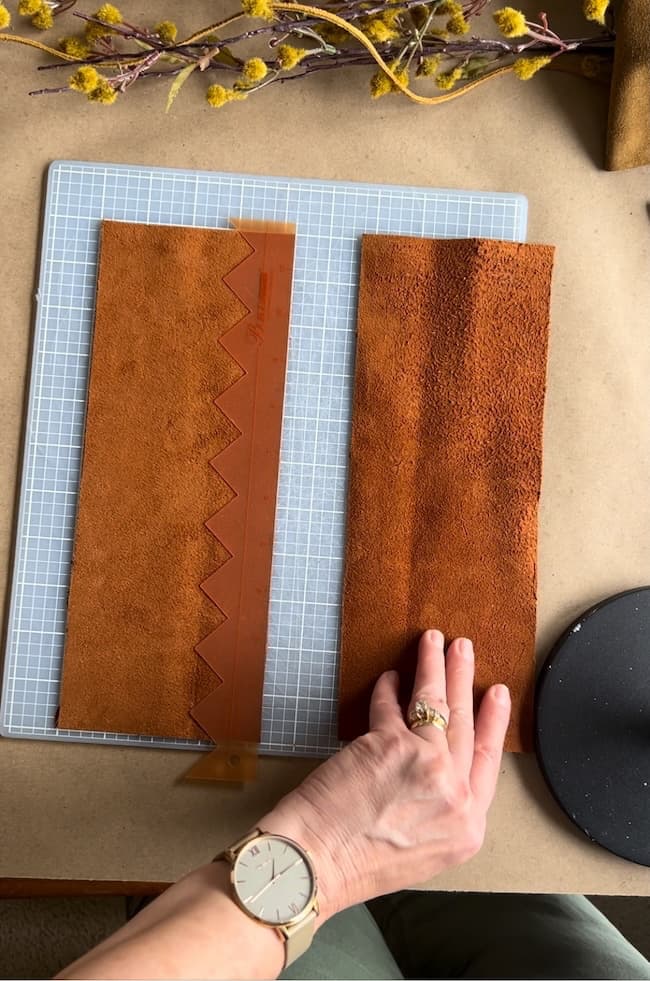
Then, using my rotary cutter and cutting mat, I simply cut the sheet of leather in half lengthwise to create two leather pieces for my two vases. If you don’t have a rotary cutter and mat, you can just use a pair of scissors for this.
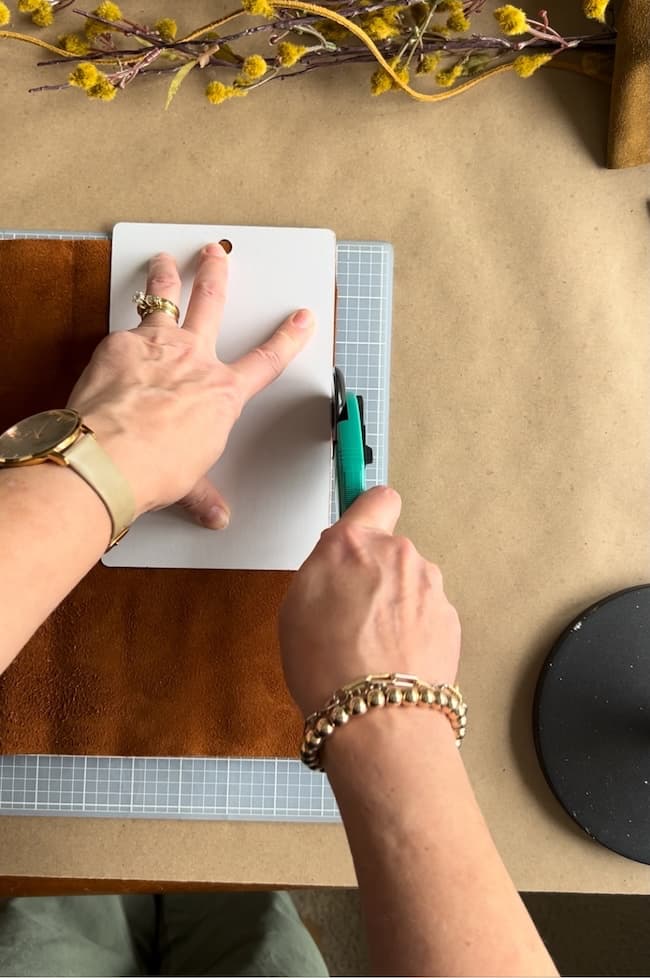
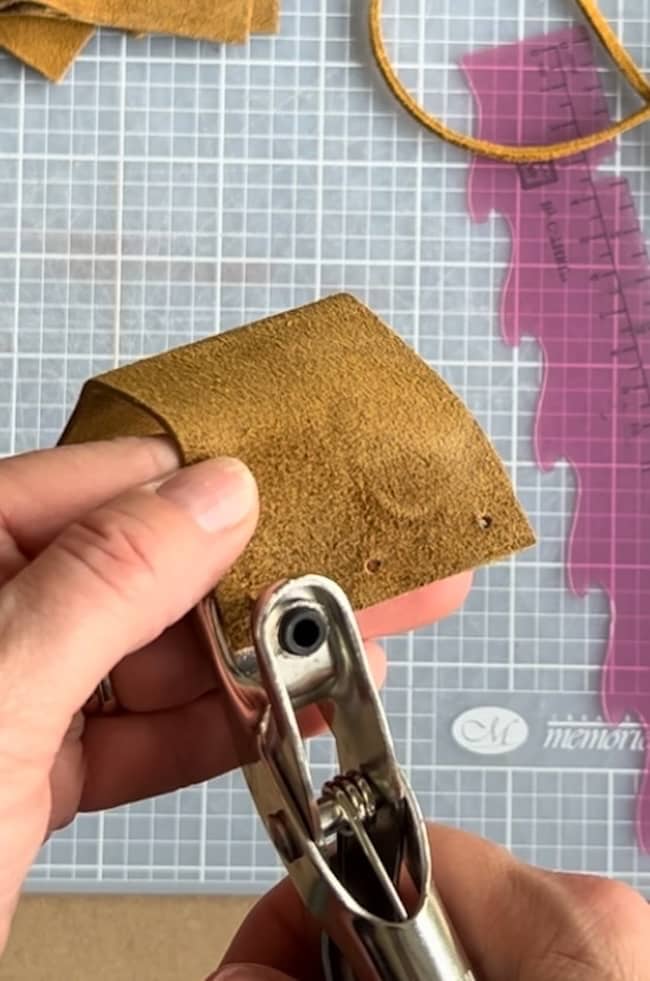
Step 2 — Punch holes for the laces.
You’ll need to determine how many holes you want for lacing the leather string. I punched 8 holes on each side for lacing.
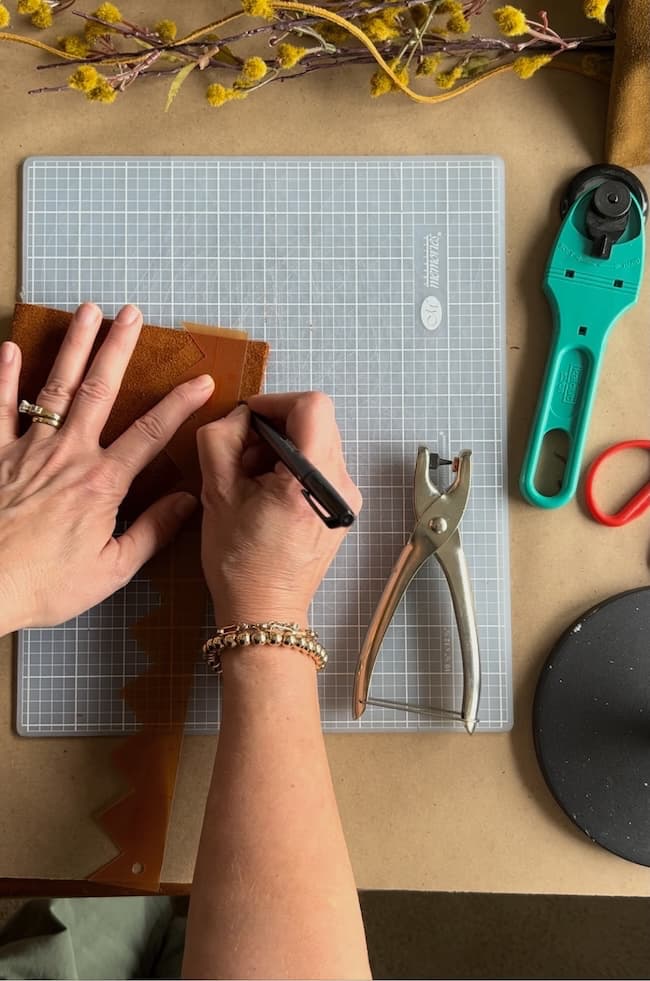

Use a ruler to evenly space your holes. You can mark the holes with a marker before punching. You’ll want to make sure the holes line up on both sides of the leather
Use the leather punch to create holes where you marked the leather. Make sure your leather punch is large enough for the string you’ll be using.
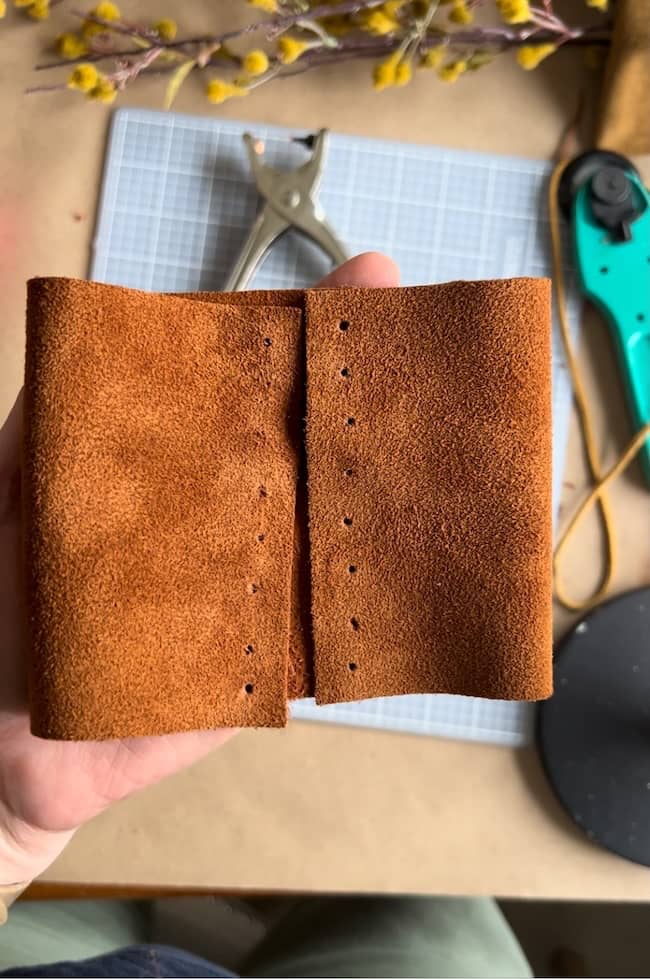
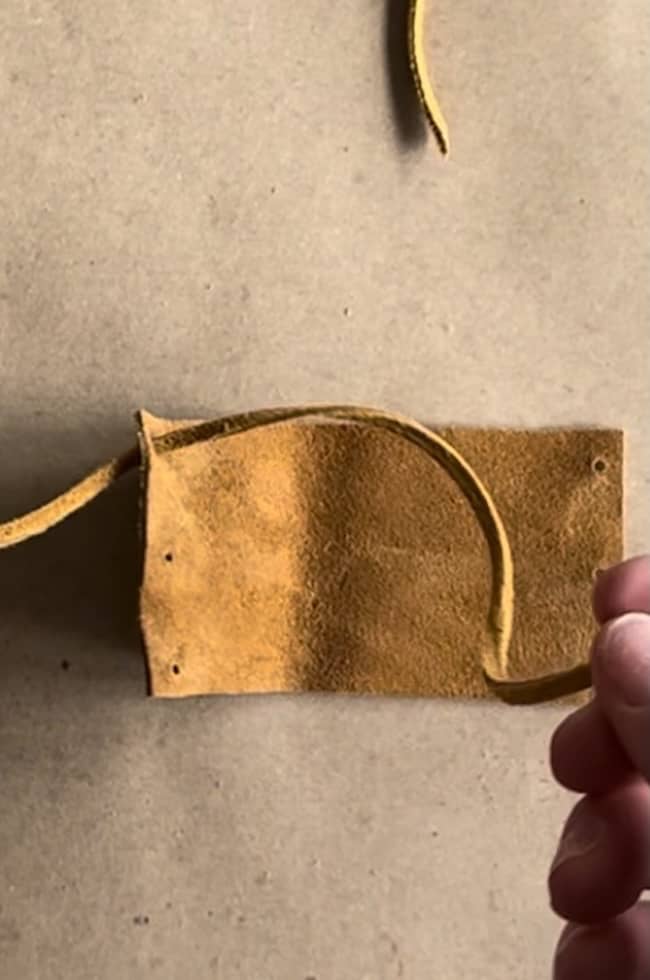
Step 3 — Lace the leather string through the holes.
Cut a long string for lacing. Make sure it will be long enough for lacing, wrapping around the vase a couple of times, and then tying off.
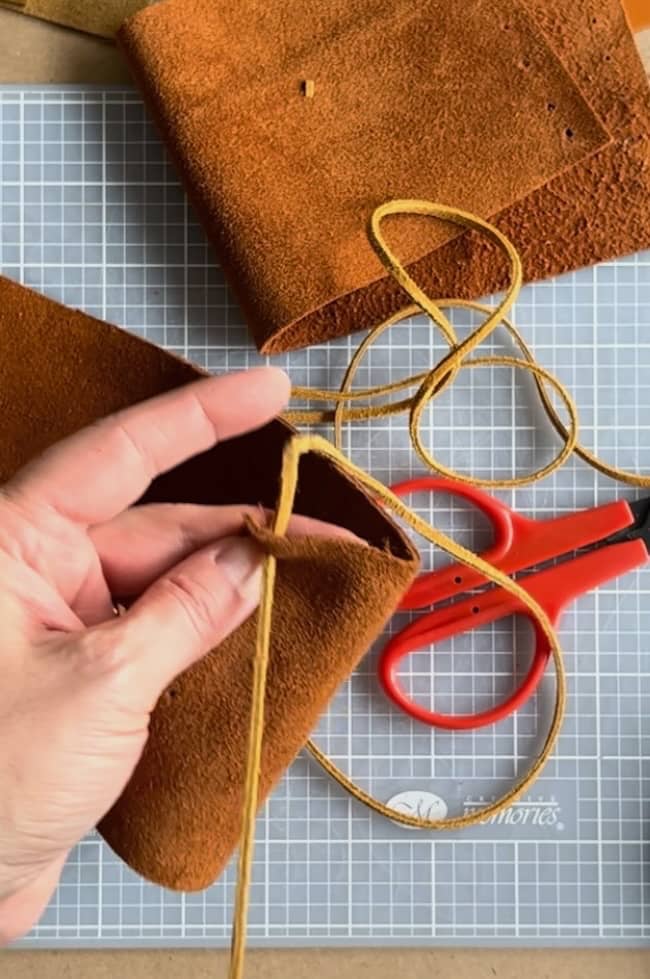

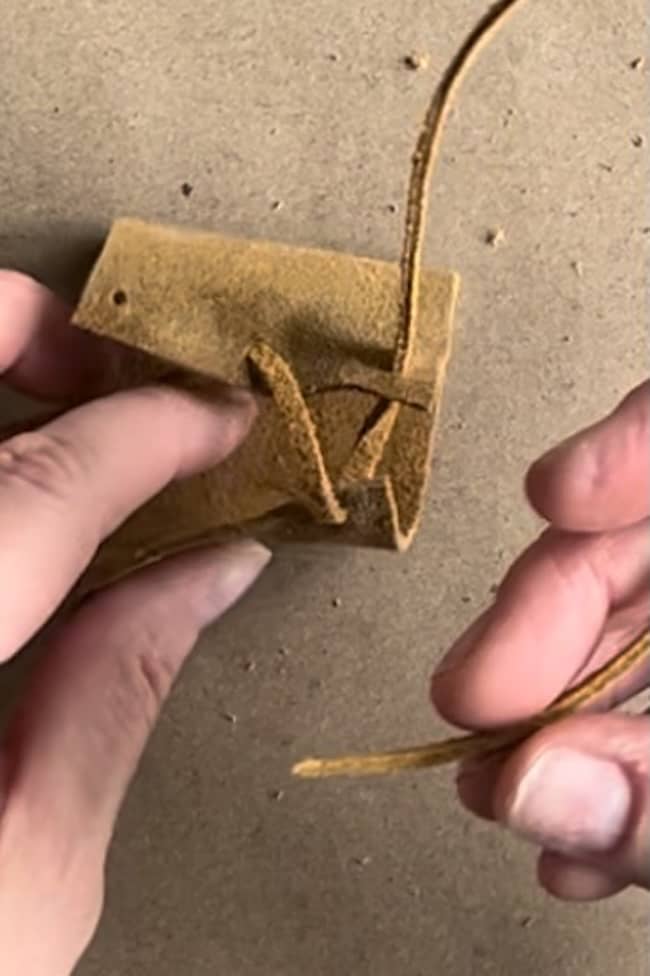
I found it helpful to cut the end pieces of the leather string at a sharp angle to thread the string through the holes. Start at one end and lace the leather string through the leather strip as you would lace a shoe.
My hole punch was a little too small for my string, so I had to stretch each hole (using a pencil) to be able to get my leather through. I also used the leather punch to try to make the holes larger.
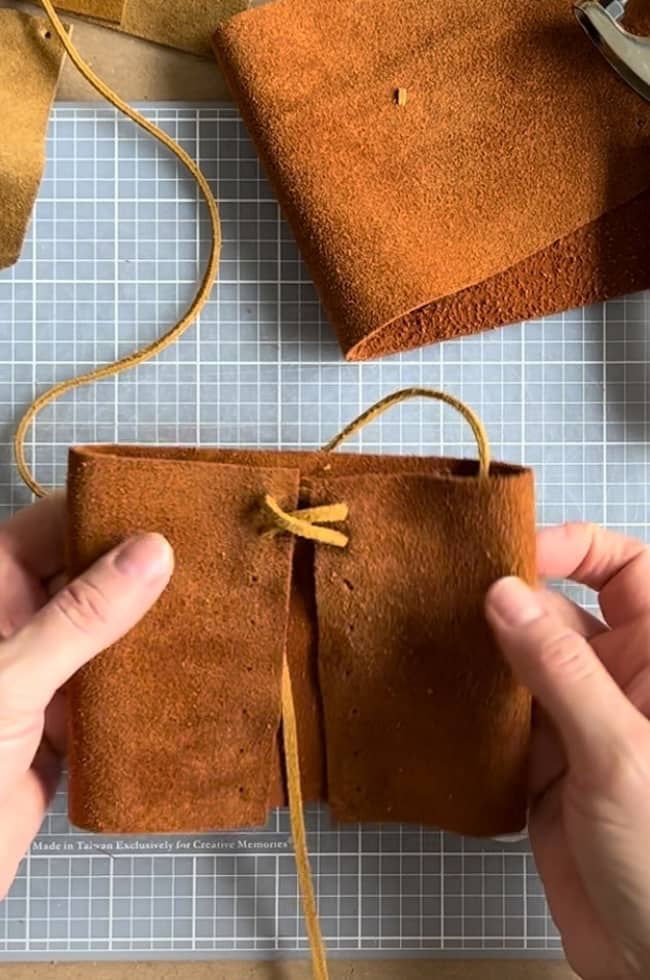
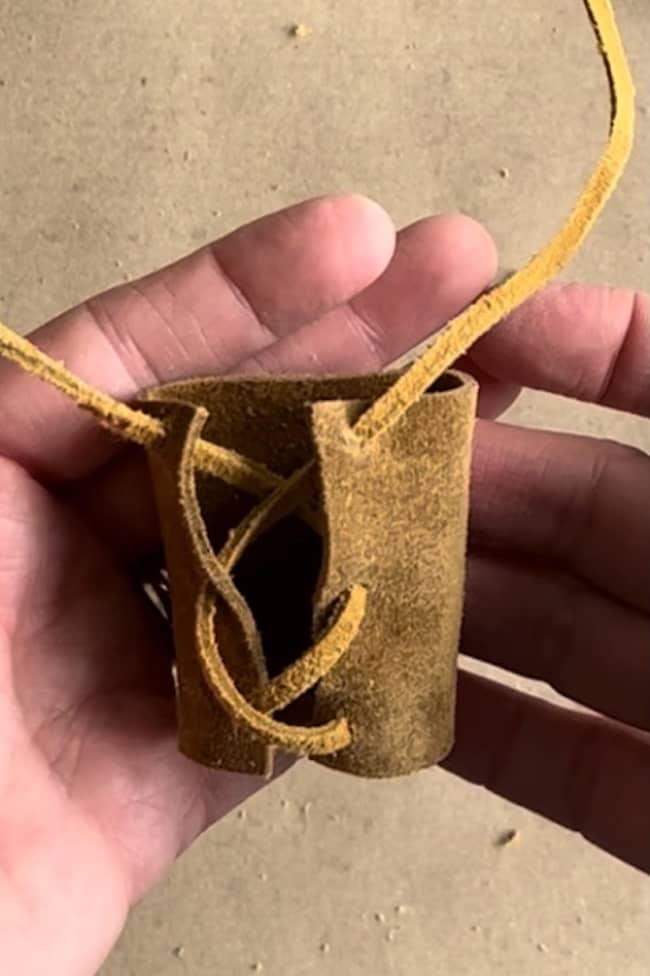
Step 4 — Insert the glass vase into the leather wrap and tie.
After you lace each leather piece, you’re ready to insert the glass vases. Gently slide the leather wrap around the vase to the position you want, and then tie the string.
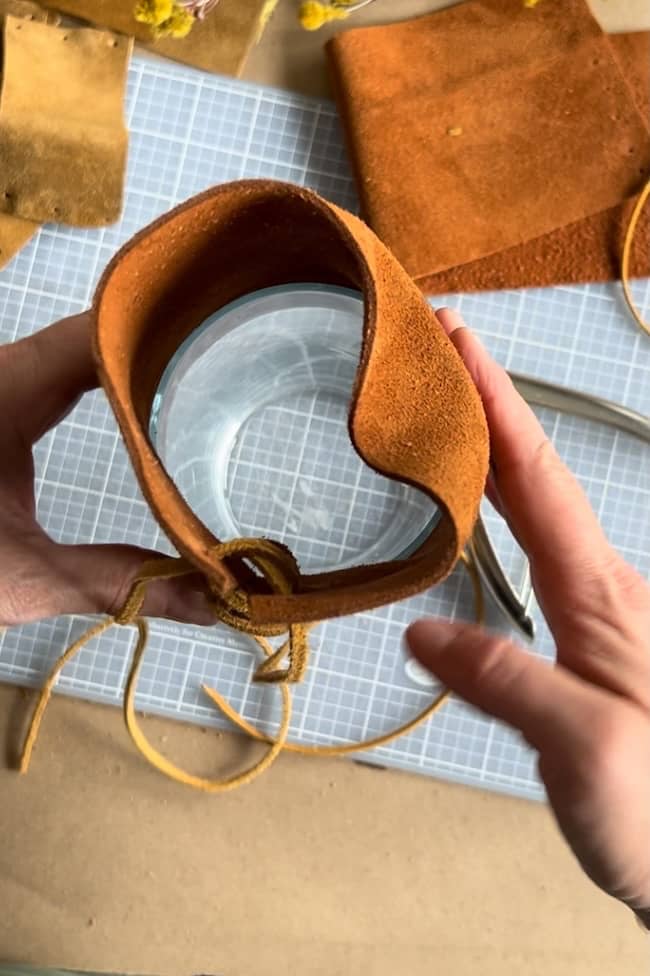
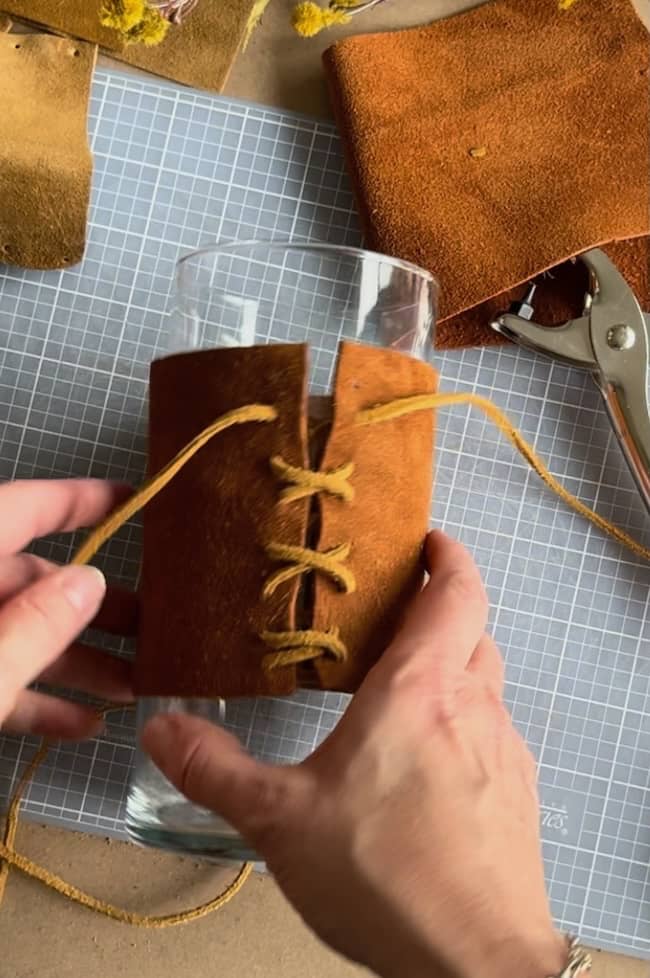
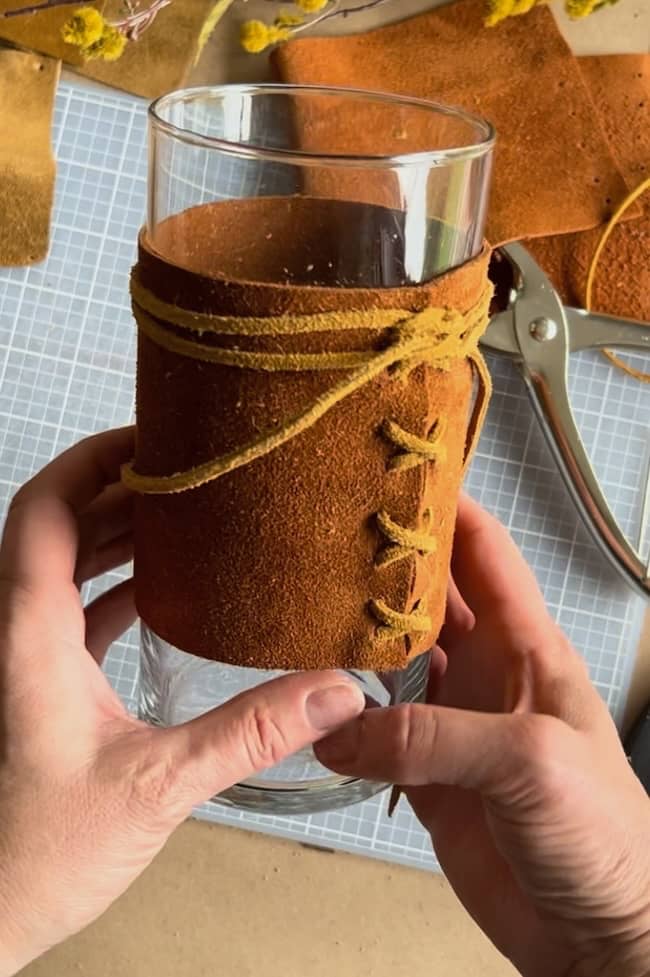
I wrapped the string around the vase a couple of times before tying the knots.
Now you’re all ready to create your fall arrangements!
Leather Napkin Ring Tutorial:
To make the leather napkin rings, you’ll follow the same steps as above, just on a smaller scale.
Step 1 — Measure and cut the leather pieces for the napkin rings.
I was able to get five 2-inch strips across the width of the leather sheet from Hobby Lobby.
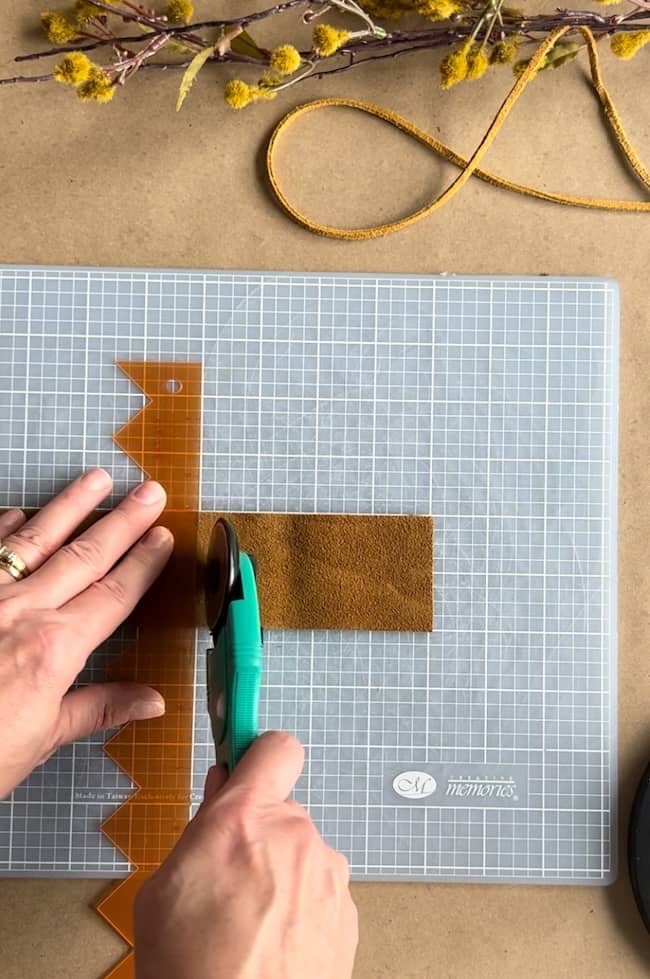
After cutting the five strips, I then cut each strip in half, which gave me enough pieces to create 10 napkin rings.
Step 2 — Punch holes for the laces.
Determine how many holes you want to punch.
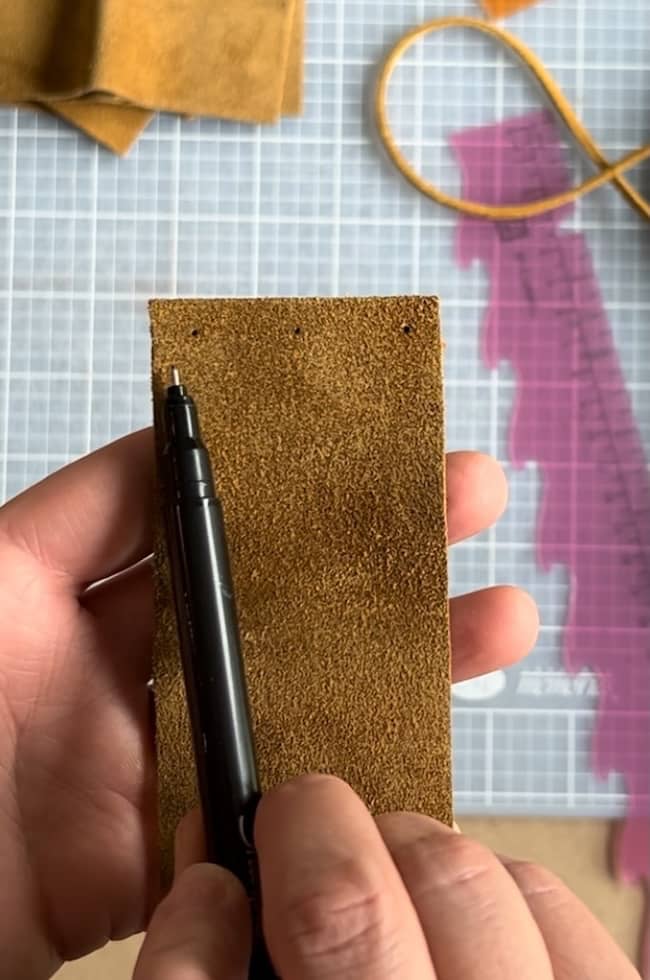

I punched 3 sets of holes into the napkin ring pieces. Be sure to measure and mark the placement of your holes before punching through with the leather punch.
Step 3 — Lace the leather string through the holes.
Cut the string for lacing the napkin rings. You’ll need enough string to loosely lace the leather and then tie in a knot at the end.
Helpful Tip: Keep the laces fairly loose through the napkin rings to make it easier to insert the cloth napkins.
Step 4 — Insert the cloth napkins into the leather napkin rings and tie.
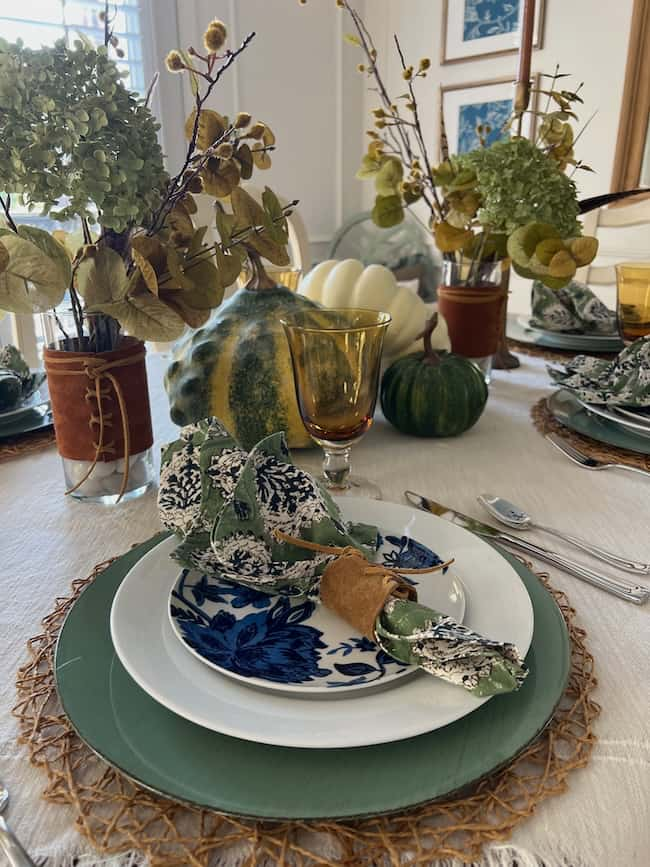
I added our new Kari green block print cloth napkins to the leather rings and I love the look!
What I Learned from This Leather Craft:
I love the way the vases and napkin rings turned out; however, if doing this project again, I would do it a little differently.
First of all, it’s important to make sure your leather punch will create a large enough whole for the leather string you’re using.
I purchased my punch from Hobby Lobby, and they only had one size punch. The holes were very small for the size string I used, so I had to really stretch the holes to be able to get the leather string through them, and it was still hard to do. A larger punch would have made it A LOT easier!
Second, if you like the look of this tablescape, and these leather accents, you can achieve a very similar look without lacing the string.
You could wrap the vase with your leather piece and simply secure it with hot glue. Then, instead of punching holes and lacing the string, you could simply wrap the string around the vase a couple of times and then tie it off.
The same is true for the napkin rings. Just glue the leather pieces into rings and then wrap them with the leather strings.
Either way creates a great look for your table. If you’re in a hurry, the hot glue method is a great alternative!
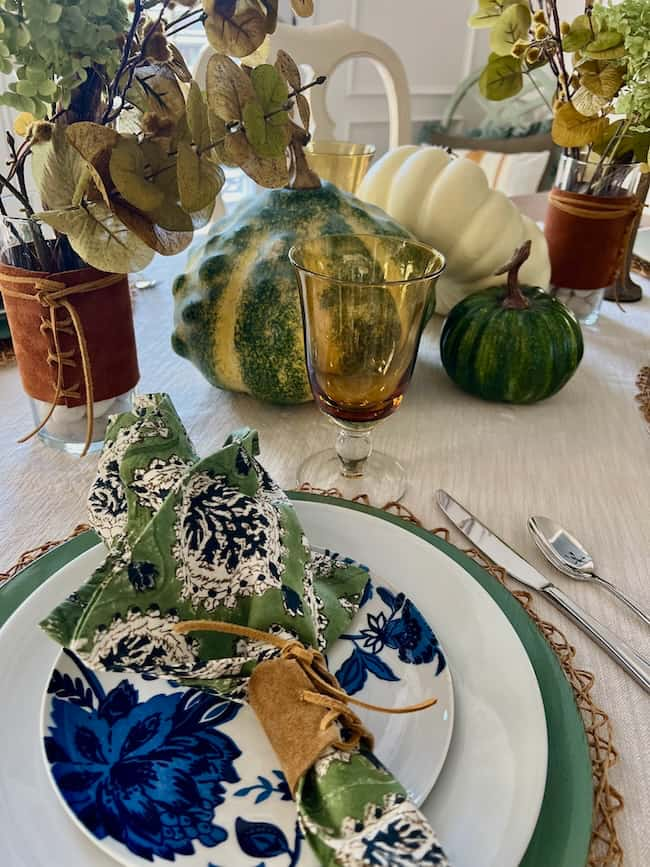
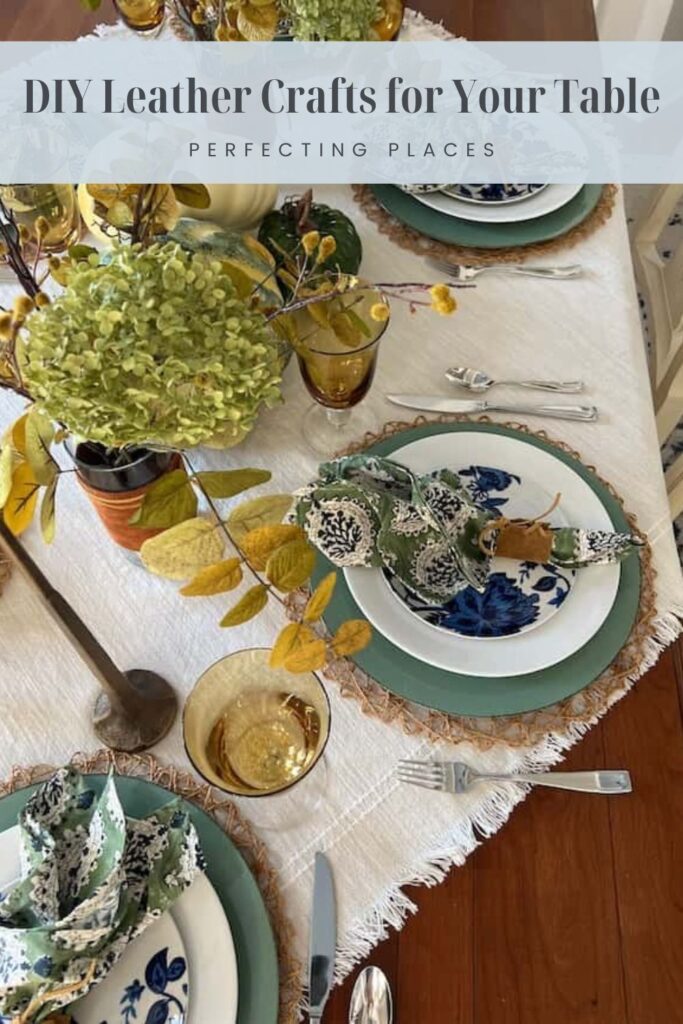
Setting a Beautiful Fall Table with Leather Accents:
Leather accents look so beautiful on a fall table. Once my leather vases and napkin rings were finished, I was excited to style them in a pretty fall tablescape!
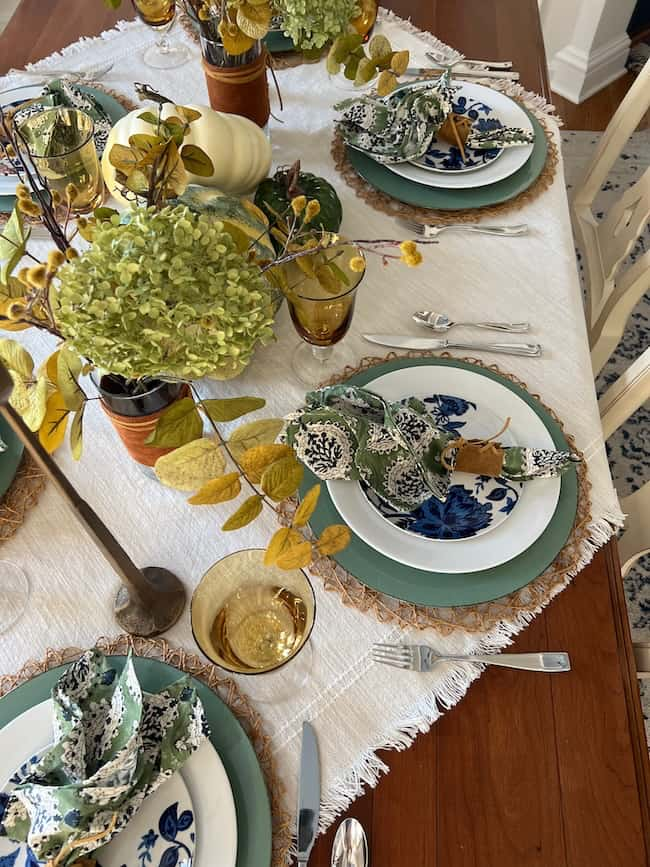
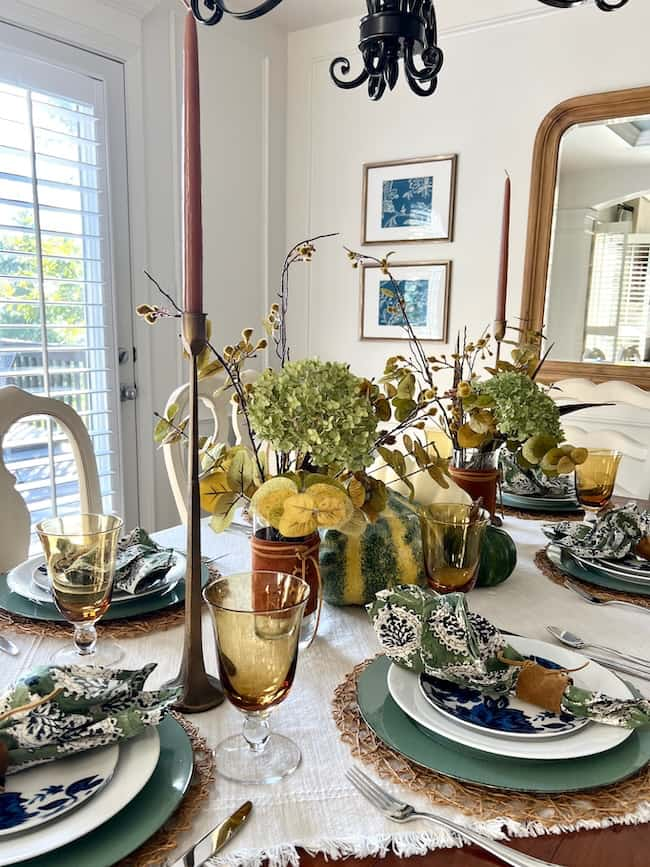
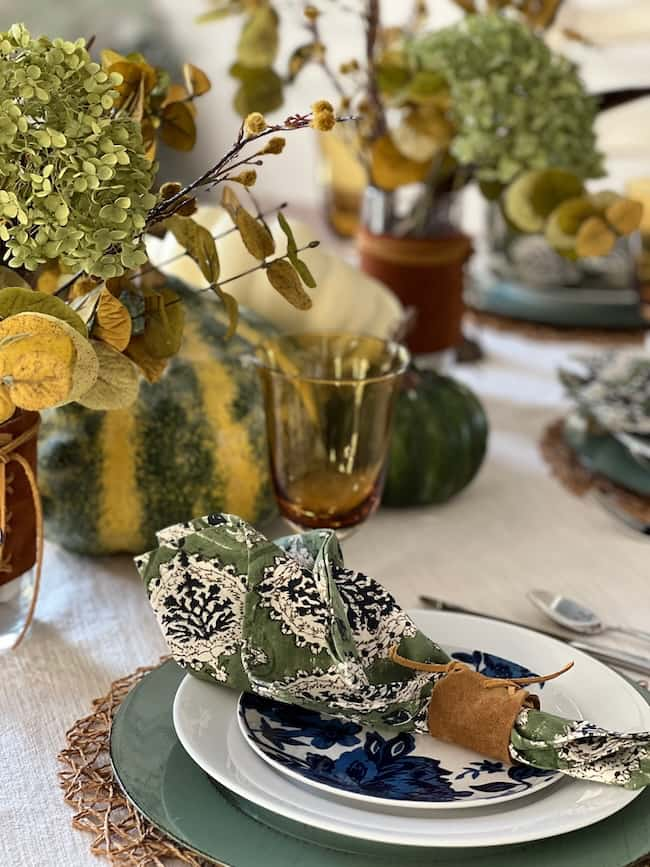
I’ve really enjoyed softer, more muted shades of fall this year, and I’ve especially loved fall shades of green. So, the warm brown leather tones of my accent pieces, my love of muted fall shades of green, and the blue and white color scheme of my dining room all come together in a pretty fall palette of green, brown, and blue on our table.
This tablescape is perfect for any fall occasion — from casual gatherings to your Thanksgiving feast. I wanted a casual and airy feel to the table, even though I used rich fall colors.
A textured, fringed off-white tablecloth brightened the look of the table, and really showcases all the other colors and textures on the table. I still wanted a more casual feeling in the room, so instead of using a full tablecloth on the entire table, I chose a smaller square tablecloth and turned in on the diagonal for a more relaxed vibe.
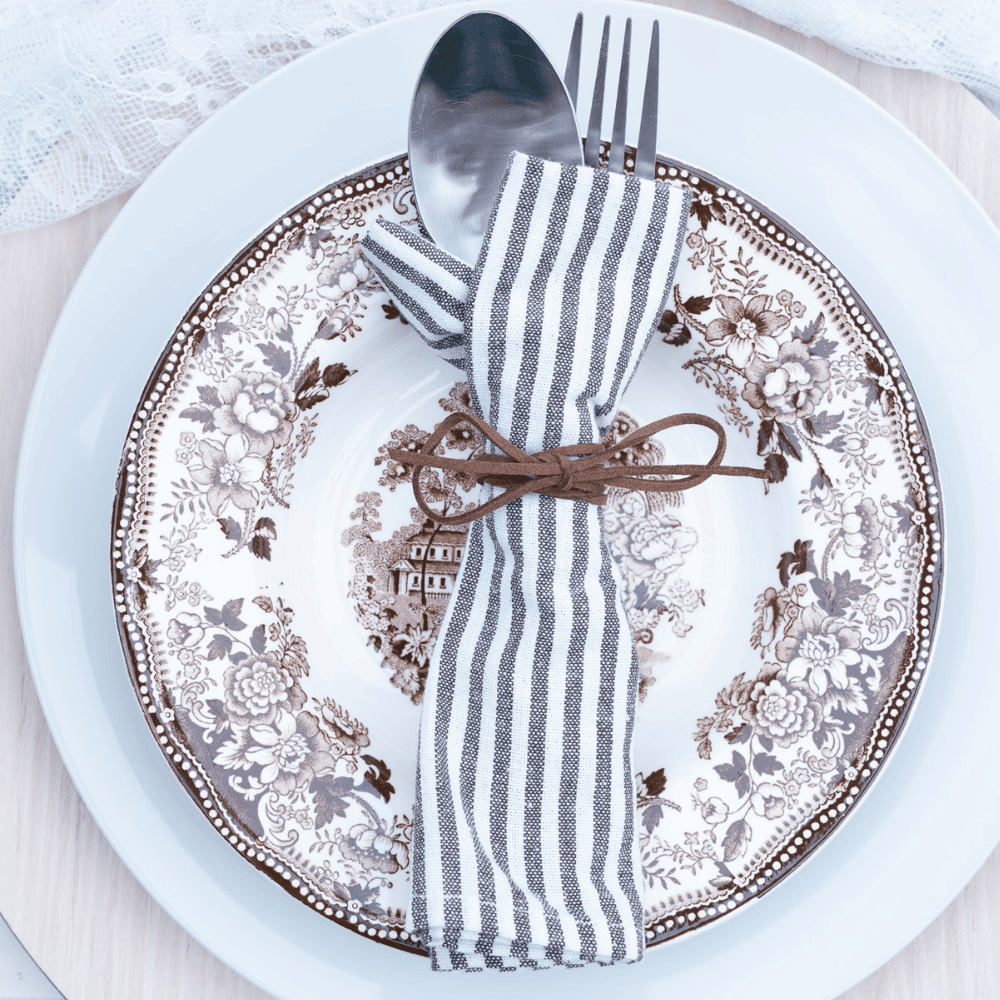
Place Settings for a Fall Table:
The place settings pull all the colors of the palette together starting with a woven brown placemat for the base. I topped the placemat with some green chargers. Next is a simple white porcelain dinner plate (contributing to the casual, light and airy feeling of the table).
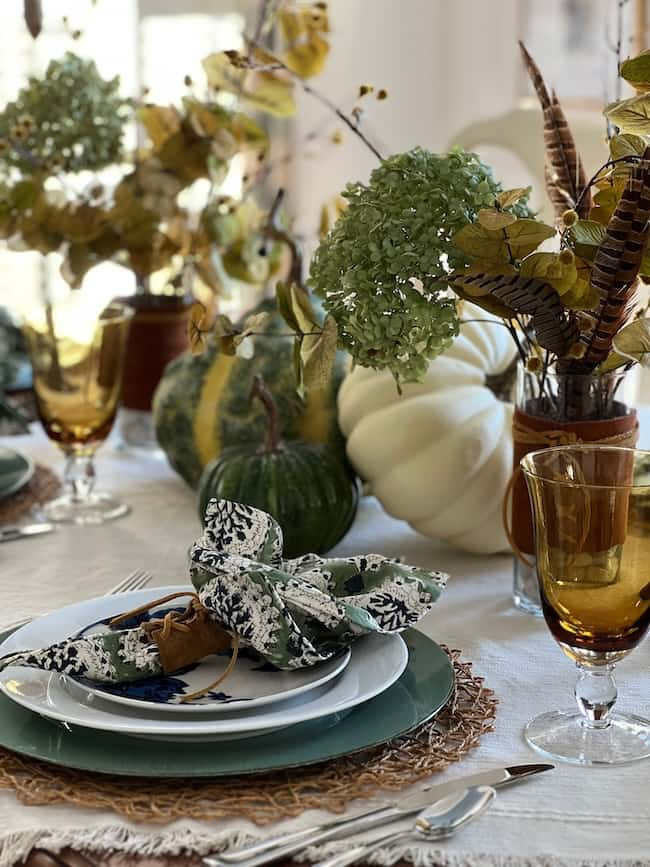
Then for pops of rich blue and green color I added these pretty blue and white salad plates. I came across these gorgeous plates last summer in the Dollar Tree, of all places, and fell in love with them. I picked up a few, but stashed them away for the perfect occasion. You can’t beat the price of $1.25 for a lovely pop of blue and white on your table!
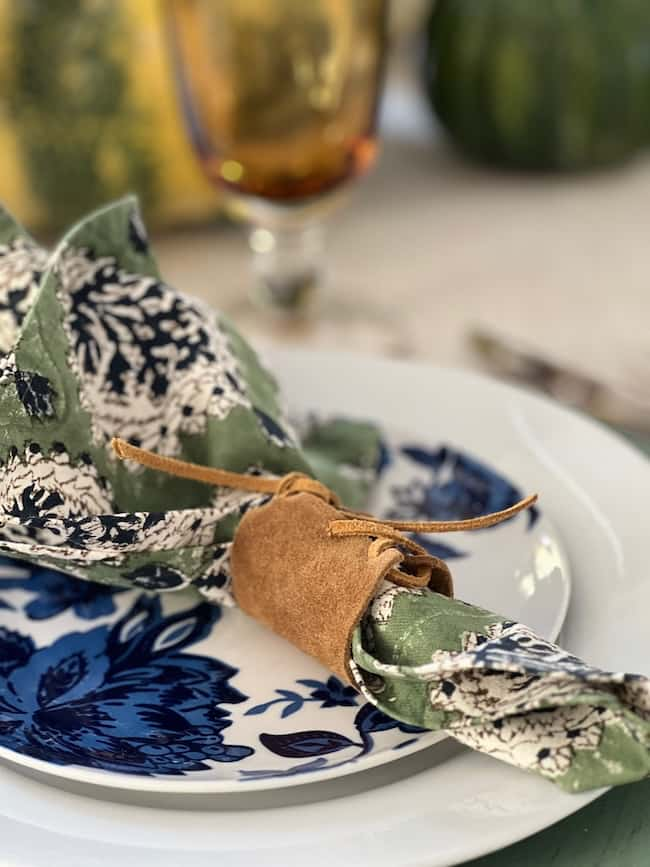
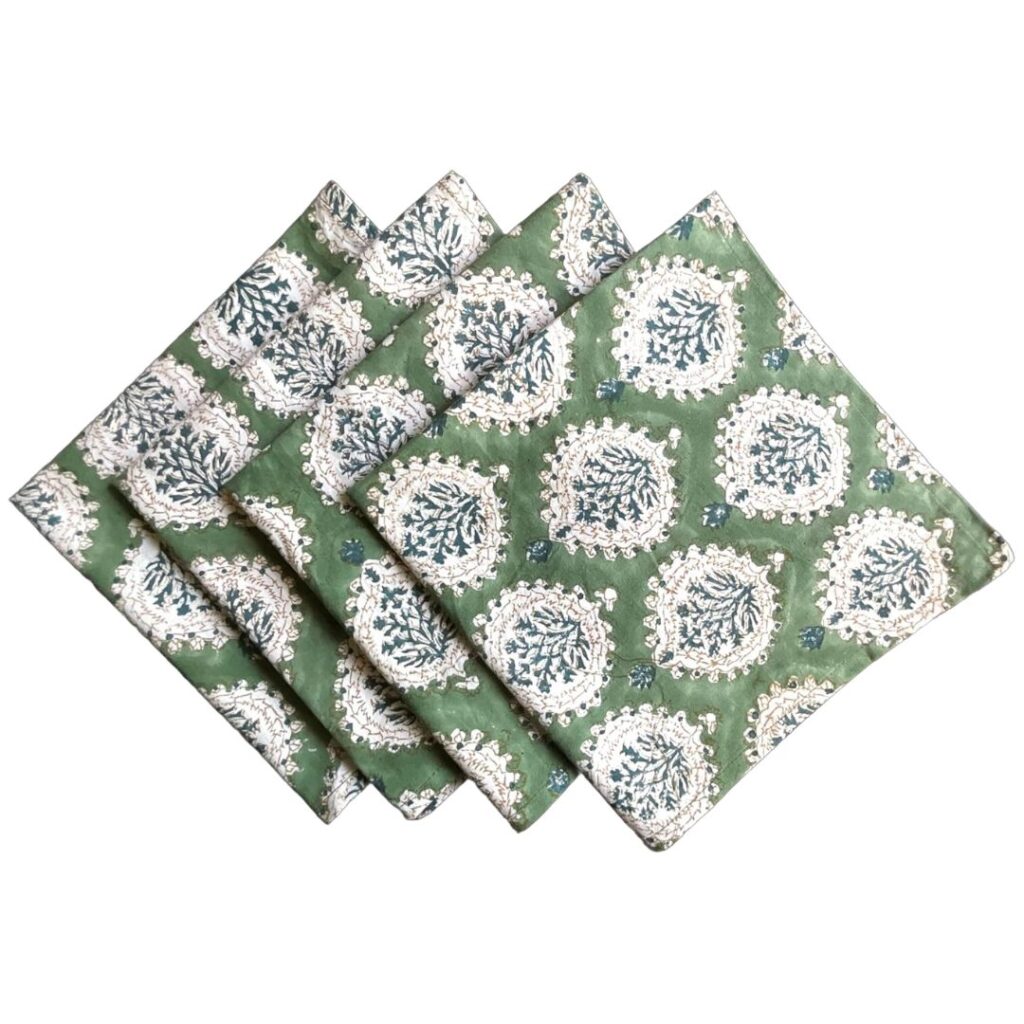
And these Kari green block print napkins have been a favorite purchase this year! Inserted in the new laced leather napkin rings, they really pull the whole color scheme together on the table!
I added amber stemware to complete the look.
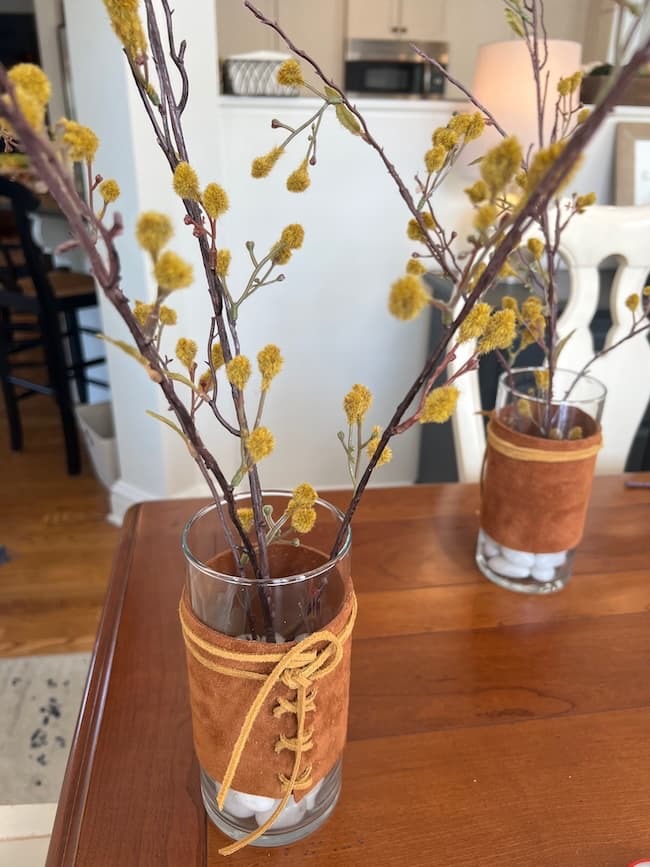
Simple Fall Centerpieces in the Leather-Wrapped Vases:
The leather vases are perfect for creating pretty fall centerpieces for our table. Keeping with the relaxed feeling of the table, I wanted simple arrangements with a wispy, gathered look.
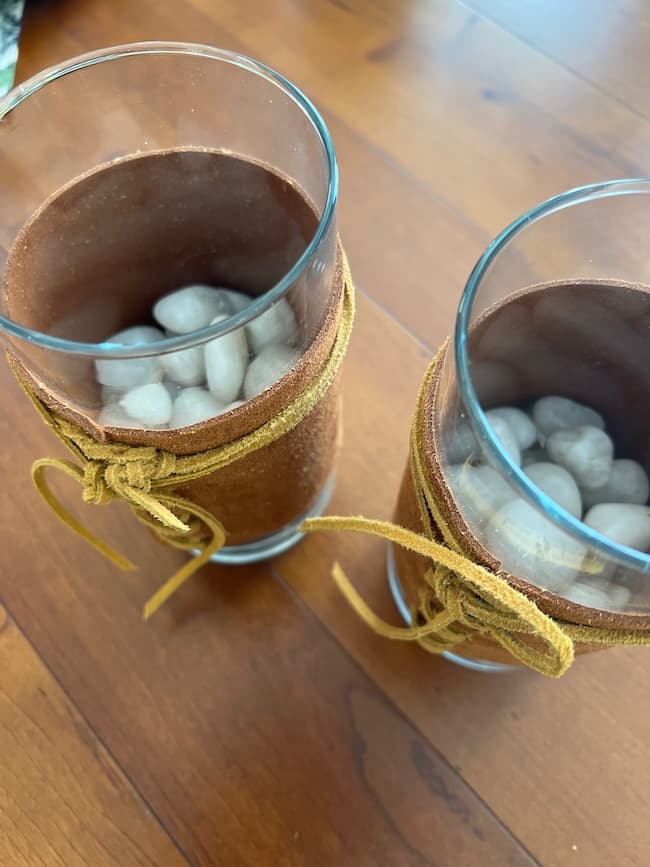
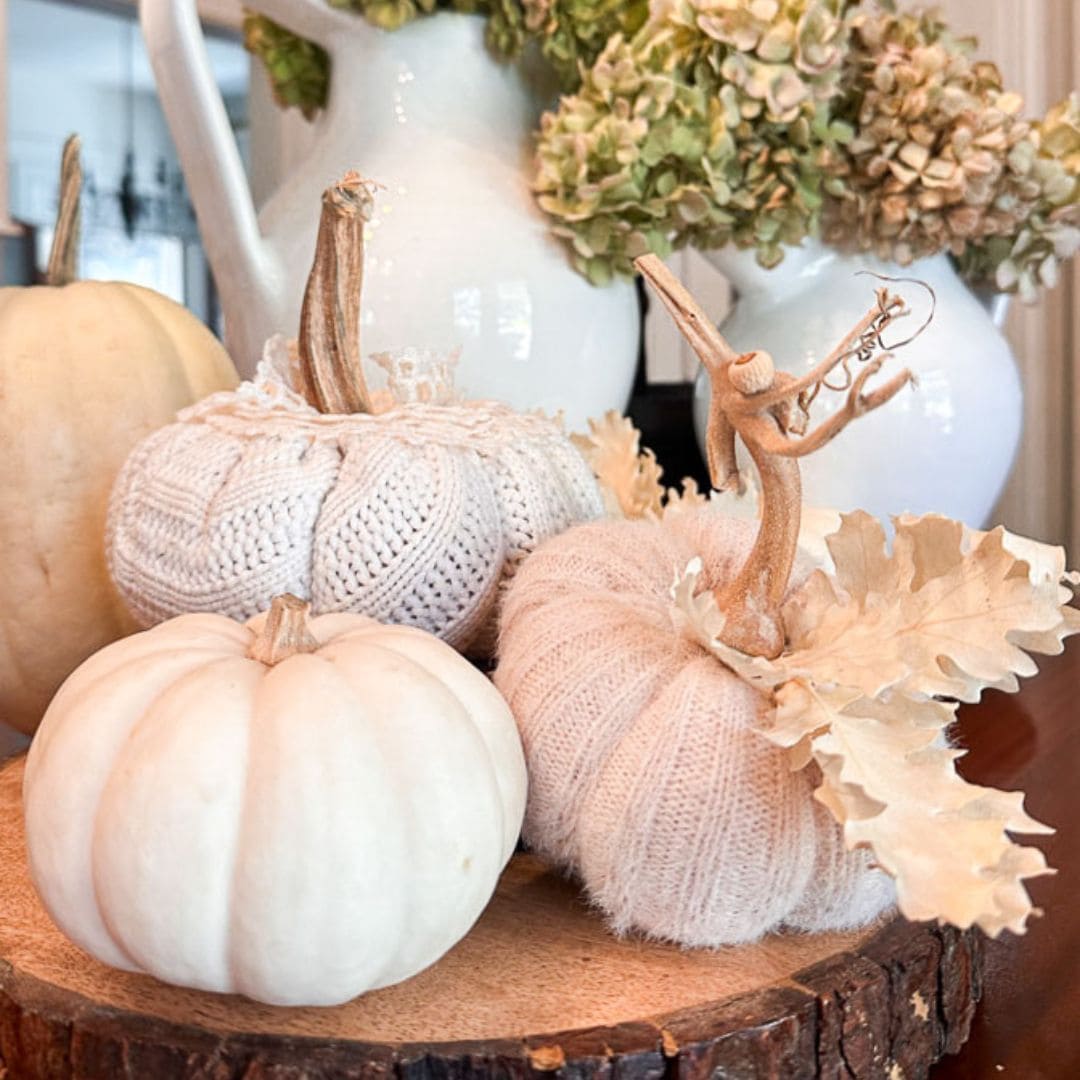
I filled each vase with decorative rock to secure the stems. I found some simple fall stems and faux fall eucalyptus branches at Hobby Lobby and combined them with dried green Annabelle hydrangea blooms from our yard.
A few long pheasant feathers add rich color and natural texture to the arrangement.
To the two centerpieces on the table, I added faux pumpkins in shades of green and white. I had these faux pumpkins on hand; however, you can certainly add real pumpkins to the table for even more natural texture.
Brown taper candles in tall brass candlesticks add the finishing touch and a warm glow to the tablescape.
Fall tablescapes are my favorite to create, and I think this table may be one of my favorites!
I hope you’re feeling inspired to create a few leather accents for your fall decor. I really love the tablescape that evolved from the leather inspiration!
I’ve never really used much leather in our decor, so I’m glad this leather-themed blog hop provided the motivation to try something new! I love the cozy fall look of the table!
For more fall tablescape ideas you might enjoy the following posts:
Thanks so much for stopping by today! Now, please be sure to check out all of the amazing leather and lace themed projects by my very talented friends below!
Happy fall decorating!


The Handcrafted Society
My friends have created some fabulous leather and laced themed projects that you won’t want to miss. Please check out these amazing creations below!


WOW! You always come up with the best ideas Kim. This is no exception. They turned out great!!!
Thank you so much, Diane! You’re so sweet!
This is such a clever use of leather suede. And the lacing makes it even better! I’m always looking for unique napkin rings and this just fits the bill! Pinned!
Thank you, Missy! I’m so glad you like it!
Such a beautiful way to celebrate the season, Kim! I love how the suede adds such pretty layer of texture to the vase and the napkin rings too. It’s definitely an extra special touch. Big hugs, CoCo
Thanks so much, CoCo! I was really pleased with the end result!
Excellent tutorial Kim and I appreciate all your tips. I have not worked with leather before, but I would love to incorporate some leather pieces into my fall tablescape. Thanks for the inspiration!
Thank you, Michelle! It was my first time working with this medium, but I really love the way it turned out!
This was so creative Kim! I love the rustic touch that you added to a beautiful fall table. The colors and textures all go together so well. I really enjoy seeing how you all come up with these creative ideas. Thanks for joining us today.
Thank you so much, Wendy! I really had a lot of fun creating this tablescape!
Kim this is absolutely fantastic! I love the suede texture and the fact that the sheets and laces are slightly different colors is so pretty. It brought your whole table design together beautifully, Pinning! XO- MaryJo
Thank you, MaryJo! You’re so sweet!
Hi Kim! I think suede is perfect for fall decor. I love your idea of wrapping glass vases and creating matching napkin holders with leather. They pair beautifully with the hydrangeas, pumpkins, and those gorgeous napkins! Great DIY!
Thank you, Donna! I love the suede with the fall decor, too!
Hi Kim – First, your fall table setting is absolutely beautiful. I love the colors you used. Second, these little leather “corsets” for the vases and napkins are charming. I also appreciated the lessons learned you shared with us. I had no idea you could even purchase a hole puncher for leather, so I learned something new. Wishing you a lovely week!
Thank you so much, Anna!
I love the suede, and it is a lovely project to do for entertaining. Thanks for sharing, Kim. Pinning for future reference.
Thanks so much, Kelly! It was a fun project to complete!