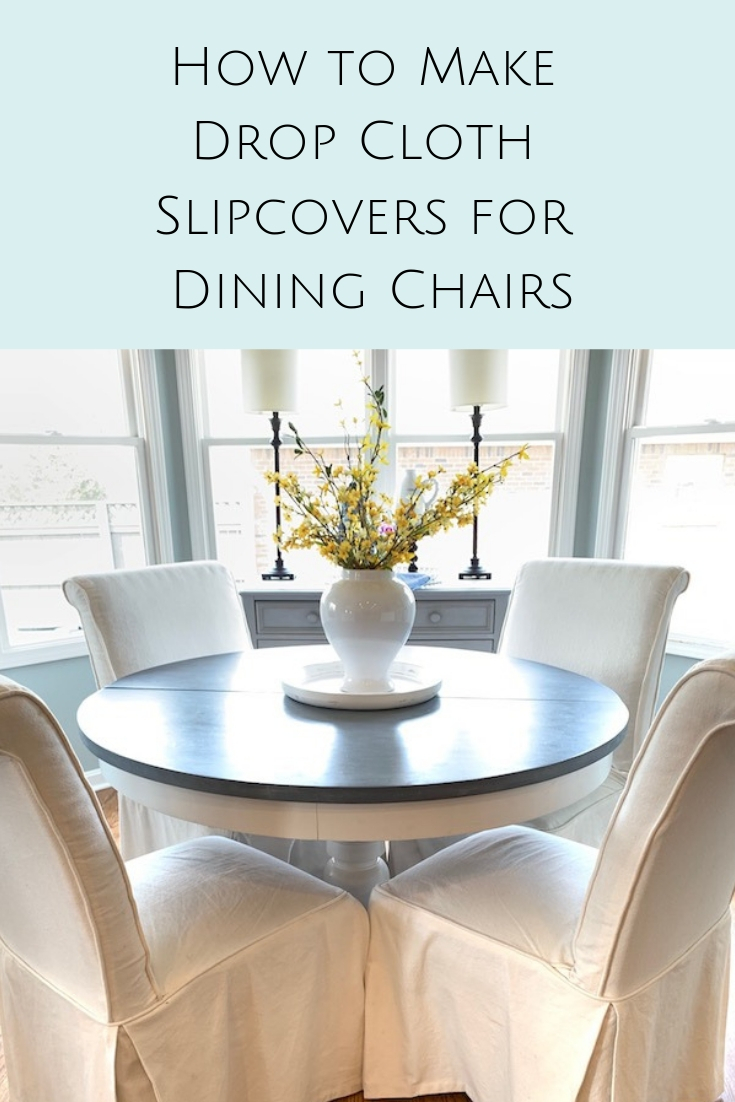
How to Make Drop Cloth Slipcovers for Rolled Back Chairs
I love the soft, cozy look that white slipcovered dining chairs add to a breakfast nook or dining area. This simple, sophisticated, yet comfortable look works great with a variety of design styles from farmhouse to transitional to modern. You can update old chairs quickly buy purchasing slipcovers, but if you want to go the inexpensive route, here are my instructions for how to make drop cloth slipcovers for rolled back chairs.
(Perfecting Places is a participant in the Amazon Services LLC Associates Program, an affiliate advertising program designed to provide a means for me to earn fees by linking to Amazon.com and affiliated sites. You do NOT pay extra for these products, and I only link to products I’ve tried personally or researched thoroughly.)

I wanted this look in our own kitchen, but didn’t want to spend a lot of money. I had a set of four old second-hand upholstered chairs in my old staging inventory that were way past due for a makeover; however, the rolled backs on the chairs required a custom design, so I set out to make my own custom tailored slipcovers.

DISCLAIMER — These are the steps I took to make my slipcovers. I am certainly no professional seamstress or upholstery expert, but just had enough gumption to figure it out and give it a good try. There are probably better, more efficient ways to accomplish this task, but this is my documented, figure-it-out-as-you-go, DIY step process. If you attempt this, I encourage you to plan your project carefully; measure, measure, measure; and have PLENTY of patience!! Hopefully my pictures and process will help you figure out the steps you can take to start your own “figure-it-out-as-you-go, DIY slipcover project”!
Steps to Make Drop Cloth Slipcovers for Rolled Back Chairs:
Supplies:

Step 1 — Use the Right Drop Cloths for Bleaching
I chose to use painter’s drop cloths for my project to save money. Painter’s drop cloths are a fraction of the cost of drapery fabric, and they can be washed and bleached to keep the slipcovers clean, which was especially important for our family since these were going in our breakfast area! They typically come in kind of a tannish-beige color, so they need to be bleached to get them nice and white.
First of all, bleaching drop cloths is not for the faint of heart.
You need a plan!
You need patience!
You need to not mind the smell of bleach fumes! (Ventilation is important.)
Handy Tip: Use 100% cotton drop cloths or you won’t be able to get the cloths white enough. I ordered these drop cloths from Amazon, and they worked great. I was able to get them very white, and after bleaching and drying, they were very soft.
I ordered 2 of the drop cloths and was able to make slipcovers for all four chairs with them, but had NOTHING left over. In hindsight, I’d recommend you order an extra drop cloth or two and go ahead and bleach them with the others so you have extra fabric on hand if needed. You can always make something else with the extra fabric — like pillows, or curtains, or table runners!
Step 2 — Bleaching the Drop Cloth
If you have a traditional top-loading washing machine with an agitator that allows you to stop and soak your drop cloth you can bleach the cloth in the washing machine. However, we had just purchased a new HE top-loading washing machine with infuser so I had to use our basement tub to soak the cloths. It actually kind-of looked like a crime scene in our bathroom with all the bleach bottles, rubber gloves, and a bathtub covered with flattened boxes (used to keep the water temperature warm enough to bleach the cloth.) I may or may not have intentionally kept our basement curtains drawn to keep suspicious neighbors from calling the police;)
I followed the Bathtub Method bleaching tutorial by Lisa Bass at Farmhouse on Boone to get the pretty white color I wanted for the drop cloths. She also includes instructions for bleaching the cloths in the washing machine.
Once the drop cloths were bleached, dried, and ironed, I was ready to measure and cut!
REMEMBER — “Measure twice (or 5 or 6 times) and cut once!”
Step 3 — Measuring and Cutting the Drop Cloth
I wanted a tailored look for the chairs with piping and a pleated skirt instead of a gathered one.
I measured the rolled chair back from where it attaches to the seat in front, up and over the back, down to the bottom where I wanted it to attach to the skirt. This would be one long piece of fabric the width of the chair back. I made sure to allow for your seams on the sides and ends. I used a 1/2 inch seam allowance.

For the seat piece, I measured from front to back and across, keeping 1/2” seam allowances in mind to cut a square for the seat. This square piece would attach to the long piece that formed the back.
I wanted the slipcover to fit tightly over and around the rolled backs of the chairs. To achieve this, I used a piece of paper to make a pattern in the curved shape of the side of the chair. I used this pattern to cut out two side pieces for each chair.


Next, I cut the pieces for the skirt. I determined how long the skirt needed to be by measuring from the cushion top to the floor. I made sure to add enough length to account for my seam allowance at the top and my hem at the bottom. This determined the width of the long piece of fabric I used to create the pleated skirt.
Next I determined how much fabric I needed for the pleated skirt to wrap around the chair. I measured the two sides and the front and back of my chair to determine the width of the flat pieces. I added 1/2″ to each end of each piece for my seam allowances. My skirt had four pleats, one at each corner. I allowed a 4-inch return in my pleats, so each pleat needed 16 inches of fabric width plus an extra inch for the 1/2″ seam allowance at each end.

These measurements added together created the total width of the long running piece of fabric I used to form the skirt with pleats at each corner. (Hint: If you don’t want any seams to show, plan and measure carefully how long each fabric piece needs to be so that all seams hit at the folds or within the pleats. Again, REMEMBER to allow for seams.)
Step 4 — Making the Piping
To make my piping strips, I cut strips of the drop cloth to cover the welting. The strips needed be wide enough to cover the welting with a 1/2 seam allowance sticking out.

I wrapped the fabric strip around the welting and stitched as close to the welting as possible along the whole length of the welting strip. This 1/4″ piping is similar.

Step 5 — Piecing Your Fabric Together
Once all of my pieces were cut, I used a dressmaker approach to piece and pin the fabric to fit the chair. REMEMBER — MAKE SURE YOU PLACE ALL OF YOUR FABRIC PIECES UPSIDE DOWN on the chair so that the right sides of the fabric are pinned together. Place the pieces on the chair and pin them together as you fit the fabric to the chair.
A. Attach the back piece to the seat piece.
First, with the right sides of the fabric together, I attached the seat square to the long chair back piece, using a 1/2” seam allowance, and then pressed the seams open with an iron.


B. Add the piping to the side pieces.
I attached the piping to the sides of my chair. On the rounded edges I cut notches to help the piping lay properly for stitching. I pinned it in place first and then stitched along the seam on the piping to attach.


C. Attach the piped side pieces to the back piece.
I placed the side pieces on the chair WITH THE PIPED SIDE FACING INWARD, and began pinning the sides to the back cover, making sure the back piece was ALSO right side facing inward.
Sewing this shape to the long piece of fabric for the chair back is what allowed the chair back to fit snugly around the rolled portion.

Once pinned, these pieces were sewn together.
D. Attach the piping to the seat.
I placed the back portion of the slipcover back over my chair with the right side facing out this time.

I wrapped a long piece of piping around the chair and pinned it to the seat and back of chair.

I removed the slipcover from the chair and attached the piping by sewing along the same seam I created when I made the covered piping.
E. Sew the skirt pieces together and make your pleats.
I attached all of my skirt pieces together and press open all of the seams. This formed a very long strip of fabric that I folded into place to create the pleats.
For the purpose of figuring out where to fold my pleats at each corner I used pins and some trial and error to pin the skirt in place on the chair. I did this with the right side facing out for placement purposes ONLY. This was just to help me set the pleats in place. I was not ready to attach it yet.


Once I had the folds and pleats pinned and placed where I needed, I removed the skirt from the chair and stitched each pleat in place with my sewing machine. There were lots of layers and it was a little tricky with my machine, but I got the job done.

F. Attach the skirt to the top of the slipcover.
I placed the slipcover back on the chair turned INSIDE-OUT.
I pinned the skirt to the slipcover top with the right side of the skirt FACING IN TOWARD the chair. So, both the top of the slipcover and the skirt were inside-out (or right side turned in). I carefully removed the pinned-together slipcover from my chair and stitched it together with my machine. Let me tell you, that was quite a workout for my machine with ALL THOSE LAYERS OF FABRIC!!
Step 6 — Iron the slipcover.
As you can image, the slipcover received quite a workout and was ready for another round of ironing before placing on the chair.
Step 7 — Hem the bottom.
I placed the slipcover back over the chair and hemmed the bottom using a slip-stitch by hand, seated on the floor. I found this to be the easiest way for me to hem, rather than hemming on the machine.


Final thoughts:
Making drop cloth slipcovers for rolled back chairs was quite a job to undertake from start to finish, but it was a very inexpensive project, and I absolutely love the way they look in my kitchen!!

Have you made slipcovers or any other projects using drop cloths? Let me know in the comments how it turned out!


By the way, do you follow me on all the socials? If not, check out my Pinterest, Instagram, and Facebook and be sure to follow along so you don’t miss out on any of my decorating and DIY ideas.

2 Comments